![]() XFLOW QUICK START
XFLOW QUICK START
This quick start guide contains the following sections:
A Simple Workflow : walks you through
a simple workflow and Java code showing how the XFlow API is used.
Examples: go through these to gain a better
understanding of how XFlow may be applied in various situations and contexts.
XFlow is a pure J2EE platform for building, executing and
managing business processes and workflows. It is a basis for building
collaborative applications as well as integrating processes across an enterprise.
XFlow has a small footprint but is extremely powerful. It is designed to be
easy to use from the development, deployment and management standpoints.
XFlow runs within an EJB and servlet container. JBoss 4.0 (with bundled Tomcat)
is the container used in this implementation. The architecture supports
distributed and parallel processes within an organization’s firewall as well as
across organizational boundaries.
XFlow is designed for scalability, extensibility and ease of integration with security models and legacy processes. XFlow’s service-oriented architecture supports both a simple Java API as well as a web-service (SOAP/HTTP) interface.
Here are some of the key features of XFlow:
- Executes and manages workflows across local and distributed processes.
- Enables process collaboration within a workflow.
- Support for n-level workflow hierarchies.
- Rule-based routing of work items
- Work items may be Java objects or XML
- Parallel flows
- Meta-data can be associated with work items.
- Meta-data can be associated with a process definition.
- Versioning of workflow models
- Synchronous and Asynchronous interfaces
- Ability to view workflow states anytime, anywhere
- Event publishing
- Pluggable authentication security modules
Forthcoming features in the pipeline include:
- GUI Workflow Model Editor
- GUI Admin Console/Dashboard
- Timeouts and Escalations
- Complex routing rules
- Work Item routing history
- JMX support
- XA Transactions
Why use XFlow?
The benefits of using XFlow are:
- Formalizes process workflows by making models explicit
- Eases application integration
- Provides flexibility in designing process workflows – easy to reconfigure processes
- Provides flexibility in defining routing rules
- Provides visibility into bottlenecks in a process workflow
- Ease of gathering statistics on the performance of participants in a process workflow
This guide walks you through several examples, each illustrating some particular feature or facet of the XFlow system. We start by looking a simple XFlow model.
Let’s say we have the following workflow model called
“SimpleWorkflow” represented in the diagram below.
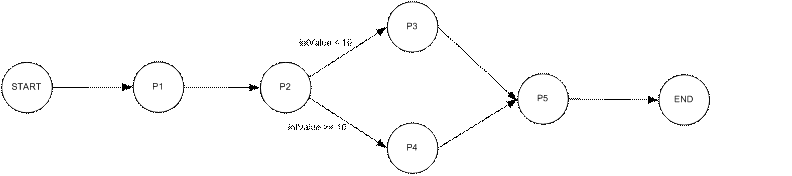
SimpleWorkflow
The nodes P1 through P5 represent processes. An XFlow process is defined to be some logic that operates on a work item. A process can be an application or a component running within an application. Once a process finishes working on a work item, the work item is passed to the next process. A rule such as “intValue < 10” may be associated with a transition. The rule is applied to the work item’s payload and if it evaluates to true, that transition is taken, otherwise not. A transition without any rule is always taken. A workflow model may also contain other types of nodes such as “AND” and “CONTAINER” nodes. We will see how these are used later. XFlow models are represented in XML using the XFLOW-XML language. For a listing of the SimpleWorkflow XML, click here.
From a workflow model, we can instantiate workflow instances. A workflow
instance always has a work item associated with it. A work item gets routed from
one process to another. It contains a payload and a set of properties. A work
item’s payload and properties can be a serializable Java object or an XML
string. For our simple example, we will use an Integer object as our payload.
Each process processes the work item by simply incrementing or decrementing the
payload’s value.
To run this example refer to Running Simple Workflow.
Now, to tie the above concepts together, let us walk through some code.
Let’s start by looking at the code that’s associated with an XFlow process i.e. the component that processes work items.
Here is the code for our example IncProcess class which corresponds to a node in our SimpleWorkflow model. The IncProcess class accepts work items and processes a work item by incrementing its Integer payload with a value supplied by the user.
import java.io.*;
import java.util.*;
import xflow.client.*;
import xflow.common.*;
import xflow.messaging.*;
import xflow.security.*;
public class IncProcess implements
InboxMessageListener {
private String procName;
private WorkflowProcess wp;
public IncProcess (String pname) {
procName = pname;
}
public void onMessage (WorkItem witem) {
System.out.println ("Process:
" + procName + " got a work item. ");
Integer ival =
(Integer)witem.getPayload();
System.out.println ("Current
payload is: " + ival);
int newVal = ival.intValue() +
getIncrementValue();
witem.setPayload (new Integer(newVal));
witem.setPayloadType
(WorkItem.JAVA_OBJECT);
try {
wp.completeWorkItem (witem);
} catch (XflowException e) {
e.printStackTrace();
}
}
//
// Get all the work items that are sitting
in our inbox.
// This is invoked when we start up.
Subsequent work items
// will be delivered to us asynchronously
via the onMessage method above.
//
public void getWorkItems () throws
XflowException {
Vector v = wp.getWorkItems ();
if (v.size() == 0) {
System.out.println ("Process:
" + procName + "'s inbox is empty");
return;
}
for (int i = 0; i < v.size(); i++) {
WorkItem wi = (WorkItem)
v.elementAt(i);
onMessage (wi);
}
}
private int getIncrementValue () {
int incVal = 0;
try {
BufferedReader stdin = new
BufferedReader(new InputStreamReader(System.in));
System.out.print ("Enter value
of increment: ");
String s = stdin.readLine();
Integer inc = new Integer (s);
incVal = inc.intValue();
} catch (Exception e) {
System.out.println
(e.getMessage());
}
return incVal;
}
public void start() throws XflowException {
wp = new WorkflowProcess
("SimpleWorkflow", -1, procName, this, new User("rtan",
"rtan"));
getWorkItems();
}
public static void main (String[] args)
throws XflowException, Exception {
String procName = args[0];
new IncProcess(procName).start();
}
}
The first thing to note is that our IncProcess class implements the InboxMessageListener interface. This allows our process to receive work items asynchronously from the XFlow system once we’re up and running. The InboxMessageListener interface has one method, onMessage which is the callback method invoked by the XFlow system when a work item is available for processing by this process. We implement onMessage as follows:
public void
onMessage (WorkItem witem) {
System.out.println ("Process:
" + procName + " got a work item. ");
Integer ival =
(Integer)witem.getPayload();
System.out.println ("Current
payload is: " + ival);
int newVal = ival.intValue() +
getIncrementValue();
witem.setPayload (new Integer(newVal));
witem.setPayloadType
(WorkItem.JAVA_OBJECT);
try {
wp.completeWorkItem (witem);
} catch (XflowException e) {
e.printStackTrace();
}
}
onMessage is invoked with a single WorkItem argument. We obtain the work item’s payload by invoking getPayload on it. We then compute a new integer value by summing the payload’s value and an increment value supplied by the user in the getIncrementValue method. We then update the payload by invoking setPayload on the work item with the new value.
We’re now done with processing and need to complete the work item.
try {
wp.completeWorkItem (witem);
} catch (XflowException e) {
e.printStackTrace();
}
By calling the completeWorkItem method on the WorkflowProcess object (discussed below) we let the XFlow system know that we’re done with the work item and in effect we are “returning” it back to the workflow to be picked up by the next process or processes.
Let’s now turn our attention to the WorkflowProcess class. A
WorkflowProcess object represents a process node in the workflow model. The act
of instantiating a WorkflowProcess binds our IncProcess instance to a node in
the workflow model – this is probably the single-most important XFlow concept
to understand!
In the start method of our IncProcess class, we instantiate
a WorkflowProcess instance as follows:
public void start() throws
XflowException {
wp = new WorkflowProcess
(“SimpleWorkflow”, -1, procName, this, new User("rtan",
"rtan"));
getWorkItems();
}
The WorkflowProcess constructor takes a workflow model name, the model’s version number (-1 means the latest version), the node name of our process, an instance of InboxMessageListener and a User object. In our example, procName will be given one of the values P1, P2, P3, P4 or P5 corresponding to the names of each of the process nodes in the SimpleWorkflow model.
Next we call getWorkItems to synchronously retrieve any work items that may have been sitting in our inbox. This simply invokes the getWorkItems method on the WorkflowProcess instance we created earlier.
Vector v = wp.getWorkItems ();
The main method of IncProcess is simple:
public static void main
(String[] args) throws XflowException, Exception {
String procName = args[0];
new IncProcess(procName).start();
}
We obtain the process name from the command line and instantiate an instance of IncProcess. Then we call start to create the WorkflowProcess instance and start processing work items. Note that IncProcess never exits; it will sit waiting for work items to be delivered by the XFlow system.
In our example, we’ll start 5 instances of IncProcess, each representing a process node in the SimpleWorkflow model.
To do this, start up 5 consoles and on each console type: java IncProcess P<n>
where n is in the range 1 .. 5
Note that that you do not have to start a process separately within its own JVM. You can have multiple processes running within a single JVM. For example, to start all 5 processes in a single JVM, execute: java RunIncProcesses “P1,P2,P3,P4,P5”
Here is the code for RunIncProcesses:
public class RunIncProcesses {
public static void main (String[] args) {
String procNames = args[0];
StringTokenizer strtok = new
StringTokenizer (procNames, ",");
while (strtok.hasMoreTokens()) {
String procName =
strtok.nextToken();
try {
new
IncProcess(procName).start();
} catch (Exception e) {
System.out.println ("Error
in starting process: " + procName);
System.out.println ("Error
message: " + e.getMessage());
}
}
}
}
Now let’s kick things off by starting the workflow. By starting a workflow, we in effect, create a workflow instance. We begin by looking at StartSimpleWorkflow.java. The code is given below.
import xflow.client.*;
import xflow.common.*;
import xflow.security.*;
public class
StartSimpleWorkflow {
public static void main (String[] args)
throws XflowException {
WorkItem witem = new WorkItem();
witem.setPayload (new Integer(0));
witem.setPayloadType
(WorkItem.JAVA_OBJECT);
WorkflowId wfId;
wfId = WorkflowManager.startWorkflow
("SimpleWorkflow", witem, new User("foo",
"foo"));
System.out.println ("Workflow
started successfully. Workflow ID: " + wfId);
}
}
In main, we first instantiate a WorkItem. The concept of a
WorkItem is analogous to an envelope
that gets passed around in inter-office mail. As it goes from one person to the
next, the envelope itself never changes but its contents and its properties
might.
In the code above, we set the contents of the work item by calling its setPayload method. In this case we will set the payload to an Integer object initialized to 0. We must also set the payload type to be JAVA_OBJECT. (We will see in later examples, how we can use XML as WorkItem payloads).
Next we start the workflow with the work item.
wfId =
WorkflowManager.startWorkflow (“SimpleWorkflow”, witem, new
User("foo", "foo"));
System.out.println
("Workflow started successfully. Workflow Instance ID is: " + wfId);
We simply invoke a static method called startWorkflow on the WorkflowManager class, passing in the workflow model name, the work item and a User object initialized with a user name and password. The XFlow system will consider the user as the initiator of the workflow. It will also authenticate the user (to be implemented in the next release). If the workflow is successfully started, a workflow instance ID is returned.
To start our SimpleWorkflow, we simply type: java StartSimpleWorkflow
Notice how the work item flows through the processes P1 through P5.
In the steps below, <xflow> refers the XFlow root directory where XFlow was installed. A Windows environment is assumed. (Scripts for UNIX/LINUX) are being developed).
1. Install
XFlow and JBoss (see Install Guide)
2. Run
JBoss. In a console, type: <xflow>\jboss4.0\bin\run
3.
Start another console. Type:
cd <xflow>
tools\setclasspath to set the XFlow classpath
(Note: setclasspath assumes the
following environment variables to be set:
JAVA_HOME , XFLOW)
4. Deploy the SimpleWorkflow model. Type the following commands:
cd examples\simple
java xflow.tools.DeployModel SimpleWorkflow.xflow
5. In another console, start the workflow processes. Type:
cd <xflow>
tools\setclasspath
cd examples\simple
java RunIncProcesses
"P1,P2,P3,P4,P5"
6. In another console, kick off the workflow. Type:
cd <xflow>
tools\setclasspath
cd examples\simple
java StartSimpleWorkflow
When you are done, you may want to check out the other examples in the <xflow>\examples directory.
Here is a brief summary of each of the other examples:
- Counter example: Shows hierarchical workflows and the use of AND nodes.
- Voting example: Shows the use of workflow variables.
- XML Payload example: Shows the use of XML payloads and XPATH rules in the workflow model.
- Servlet example: Shows how to use the XFlow API from a servlet. You should run example 2 first as this builds on it.
- Web Service example: Shows how to invoke XFlow Web Services.
- Approval example: Demonstrates the use of AND and OR nodes in an approval workflow.
This example is similar to the SimpleWorkflow except that it introduces AND nodes and CONTAINER (sub-workflow) nodes.
Here is the workflow model for the Counter example. See XFLOW-XML representation
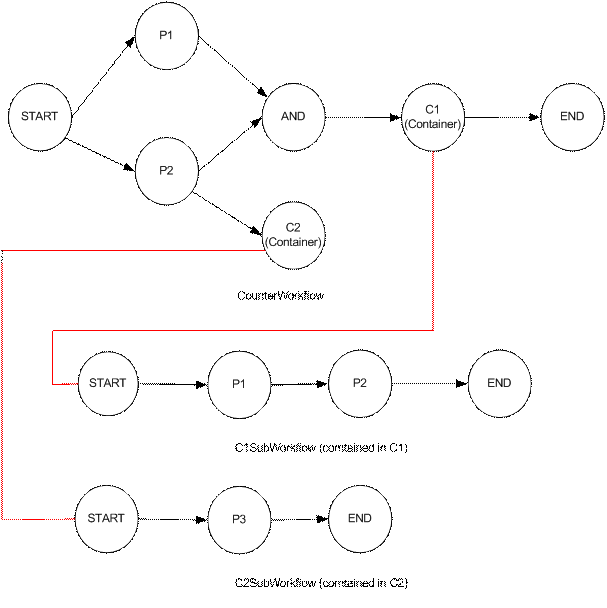
In the model above, processes P1 and P2 transition to an AND
node. This means that both P1 and P2 have to complete before transitioning to
the node C1.
C1 is a CONTAINER node. It “contains” a sub-workflow called “C1SubWorkflow”.
(Note that the names P1 and P2 are re-used in the sub-workflow. This is allowed
since the scope of process names is the workflow model.) When C1 is reached,
the XFlow engine will invoke the START node of the containee workflow,
C1SubWorkflow. The invocation of the
containee’s START node is in the context of the current workflow thread (i.e.
the container workflow blocks and waits for the containee workflow to
complete). When the containee’s workflow reaches its END node, the workflow
unwinds back to the previous level and continues from that point.
C2 is another CONTAINER node. It contains a sub-workflow
called “C2SubWorkflow”. C2SubWorkflow is a simple workflow that has only one
process node, P3. Notice that there is no transition coming out of C2. This
means that the containee subworkflow is started in a separate thread . If a
CONTAINER node does not have any transitions going out of it, the XFlow system
will spawn a new instance of the containee workflow in a separate workflow
thread. In other words, it is a system-initiated workflow instance.
A sub-workflow can be defined once and then shared by other workflow models.
CONTAINER nodes are also useful as a mechanism for hiding or encapsulating
sub-workflows.
In this example, we we pass around a WorkItem with no
payload (this is allowed) but contains an Integer property. This property’s value is updated by
each process as it transitions through the workflow.
To run the counter example:
- Deploy the workflow models. On a console type:
cd <xflow>
tools\setclasspath
cd examples\counter
java xflow.tools.DeployModel C1SubWorkflow.xflow
java xflow.tools.DeployModel C2SubWorkflow.xflow
java xflow.tools.DeployModel CounterWorkflow.xflow
- Run the P1 process in the main workflow. On a console #1 type:
cd <xflow>
tools\setclasspath
cd examples\counter
java CounterProcess CounterWorkflow P1
- Run the P2 process in the main workflow. On a console #2 type:
cd <xflow>
tools\setclasspath
cd examples\counter
java CounterProcess CounterWorkflow P2
4. Run the C1 sub-workflow processes. On a console #3 type:
cd <xflow>
tools\setclasspath
cd examples\counter
java RunC1SubProcesses
5. Run the C2 sub-workflow processes. On a console #4 type:
cd <xflow>
tools\setclasspath
cd examples\counter
java RunC2SubProcesses
6. Start the workflow. On a console #5 type:
cd <xflow>
tools\setclasspath
cd
examples\counter
java StartCounterWorkflow
Here is the workflow model of the Voting example. See XFLOW-XML representation.
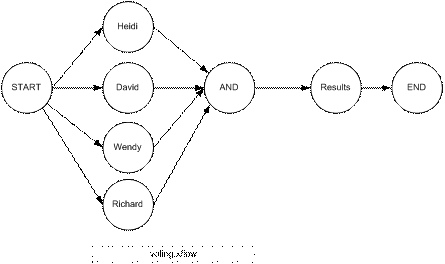
In this example, A work item whose payload is a String object (some question) is routed to the voting processes, “Heidi”, “David”, “Wendy” and “Richard”. Each process “votes” by setting a workflow variable (with a name equal to the process name) with the response. For example when David gets a work item, it sets its response in the variable called “David”. When all voting processes have completed, the Results node consolidates and prints out the results.
A workflow variable’s scope is restricted to a workflow
instance. Within, a workflow instance however, the variable is global in scope
and can be seen by all processes within the instance. A variable can be any
Java object which is Serializable.
To run:
- Deploy the Voting workflow model. On a console, type:
cd <xflow>
tools\setclasspath
cd examples\voting
java xflow.tools.DeployModel Voting.xflow
- Run the 4 voting processes. Start up 4 different consoles. On a console type:
cd <xflow>
tools\setclasspath
cd examples\voting
java VotingProcess <name> where <name> is one of (Heidi, David,
Wendy, Richard)
3. Start the Results process. On a console type:
cd <xflow>
tools\setclasspath
cd examples\voting
java ResultsProcess
4. Start the
workflow. On a console type:
cd <xflow>
tools\setclasspath
cd examples\voting
java StartVoting "Will man set
foot on Mars by 2050? "
3. XML Payload Example
Here is the workflow model of the XML Payload example. See XFLOW-XML representation.

In this example, the payload of the work item is an XML fragment as shown below:
<book>
<title>XFlow User Guide</title>
<detail>
<price>11.00</price>
<pages>120</pages>
<author>John Doe</author>
<inventory copies="55"/>
</detail>
</book>
The transitions from P2 to P3 , P2 to P4 and P3 to P5 are associated with XPATH rules expressions.
To run the XML example:
1. Deploy the workflow models. On a console type:
cd <xflow>
tools\setclasspath
cd examples\xml
java xflow.tools.DeployModel XMLExample.xflow
2. Run the processes. On a console type:
cd <xflow>
tools\setclasspath
cd examples\xml
java
RunXMLProcesses "P1,P2,P3,P4,P5"
3. Start the workflow. On a console
cd <xflow>
tools\setclasspath
cd examples\xml
java StartXMLExample book.xml
This example demonstrates how to invoke the XFlow API from a servlet as shown in the diagram below:

This example should be run after you have run the voting example in the examples\voting folder.
It allows the users to vote from a web-browser and shows how a servlet/JSP can communicate with the
XFlow server. The code fragment for the Get Question servlet is shown below:
import javax.servlet.*;
import javax.servlet.http.*;
import java.io.*;
import java.util.*;
import xflow.client.*;
import xflow.common.*;
import xflow.security.*;
public class GetQuestionServlet
extends HttpServlet {
public void service(HttpServletRequest
req, HttpServletResponse res) throws IOException {
res.setContentType("text/html");
PrintWriter out = res.getWriter();
// Get the user name from the web
browser
String name =
req.getParameter("name");
// Store the name in session
req.getSession().setAttribute
("name", name);
// Get the work items for this user. Note
that we are using name as the process name
WorkflowProcess wp = null;
Vector workitems = null;
try {
wp = new WorkflowProcess
("Voting", -1, name,
null, new User("foo",
"foo"));
req.getSession().setAttribute
("workflowprocess", wp);
workitems = wp.getWorkItems();
if (workitems.size() == 0) {
out.println ("Sorry There
is no question for you at this time");
return;
}
} catch (XflowException e) {
out.println (e.getMessage());
return;
}
// Although we can potentially get
more than one work item –
// we'll just work on the first one in the list
WorkItem wi =
(WorkItem)workitems.elementAt(0);
String question =
(String)wi.getPayload();
…………..
}
The “Send Answer” servlet (refer to the code in SendAnwerServlet.java) calls WorkflowManager’s “setVariable“ and WorkflowProcess’s “completeWorkItem” to send the answers back to the server.
Follow these instructions to run the example. The env
variable XFLOW must be set to the root directory where XFlow is installed.
1. Make sure the XFlow JBoss server is up and running.
2. Download tomcat 4.1.* (if you don't have tomcat)
3. Insert the following into <tomcat>\bin\setclasspath.bat
set CLASSPATH=%CLASSPATH%;%XFLOW%\classes
set CLASSPATH=%CLASSPATH%;%XFLOW%\jboss4.0\client\log4j.jar
set CLASSPATH=%CLASSPATH%;%XFLOW%\jboss4.0\client\jboss-all-client.jar
set CLASSPATH=%CLASSPATH%;%XFLOW%\jboss4.0\client\jboss-j2ee.jar
set CLASSPATH=%CLASSPATH%;%XFLOW%\jboss4.0\client\jnp-client.jar
4. Copy %XFLOW%\conf\jndi.properties to <tomcat>\bin\
5. Modify port in <tomcat>\conf\server.xml and change 8080 to 8888
(This is because port 8080 is already used by JBoss).
6. Copy %XFLOW%\examples\votingServlet folder to tomcat\webapps
7. Start tomcat <tomcat>\bin\startup
8. Start a new console and do the following:
cd %XFLOW%
tools\setclasspath
cd examples\voting
java StartVoting "Who should become the next president?" (or your favorite question)
java ResultsProcess
8. Bring up http://localhost:8888/votingServlet/voting.jsp in your web browser
9. Enter Name: Richard and click on Get Questio
10. Answer the question and click on Send Answer
11. Repeat 9 - 10 for the other 3 voters: Heidi, David and Wendy
12. When all the answers are in, the ResultsProcess should print the answers from all respondents in
the console.
The folder in examples\webservices contains example programs which invoke
XFlow web services.
The web services JAVA code was auto-generated using the Axis WSDL2Java tool by
running:
java org.apache.axis.wsdl.WSDL2Java http://localhost:8080/axis/services/XFlowService?wsdl
Writing the web-service client is quite straightforward. Here is an example of the StartWorkflow client:
import localhost.*;
import XflowService.User;
import XflowService.WorkItem;
import XflowService.WorkflowId;
public class StartWorkflow {
public static void main (String[] args)
throws Exception {
// Get a handle to the web service
XflowService service = new
XflowServiceServiceLocator().getXflowService();
// Set up the work item
String name = args[0];
WorkItem item = new WorkItem();
item.setPayload (new Integer(2));
item.setPayloadType
("JavaObject");
User user = new User ();
user.setName ("David");
user.setPassword ("foo");
// Invoke startWorkflow
WorkflowId id = service.startWorkflow (name, -1, item,
user);
System.out.println ("Workflow
started. ID = " + id.getId());
}
}
To run the above example, do the following:
- cd <xflow>\examples\webservices
- setclasspath
- java StartWorkflow SimpleWorkflow (assumes you have deployed SimpleWorkflow.xflow)
Refer to the code in DeployModel.java, GetActiveWorkflows.java, GetWorkItems.java in the folder for how to run the other web services examples.
In this example, we show how a work item may be routed through various user roles
for approval or rejection. The model is shown in the diagram below.
The XML file is given here.
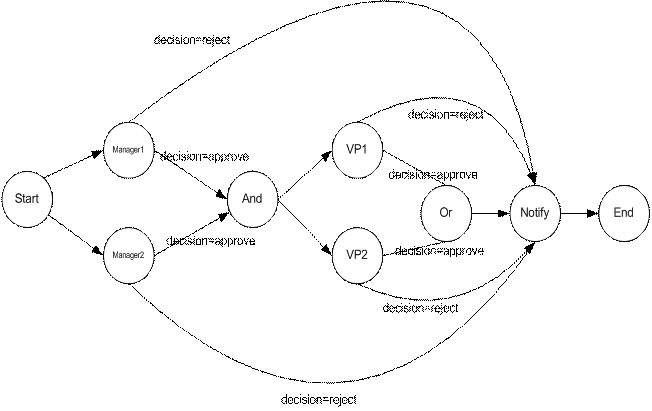
In the above example workflow, a work item is routed to Manager 1 and Manager 2 in parallel. Both must approve it. Then the work item is routed to VP1 and VP2.
Either one can approve it. Note that in the unlikely event that VP 1 and VP 2 were to make their decisions at about the same time (possiby conflicting, one could approve and the other reject), the workflow engine will take the one that was executed first. The Notify node simply prints out the decision that was taken.
To run this example, do the following:
1. Deploy the Approval workflow model. On a console type:
cd <xflow>
tools\setclasspath
cd examples\approval
java xflow.tools.DeployModel approval.xflow
2. Now start the approval workflow. On the same console as #1, type:
java StartApprovalWorkflow
3. Run the processes for Manager1, Manager2, VP1 and VP2. Bring up 4 consoles and on a console type:
cd <xflow>
tools\setclasspath
cd examples\approval
java
ApprovalProcess <role> for example: java ApprovalProcess Manager1
4. Start the Notify process. On a console
cd <xflow>
tools\setclasspath
cd examples\approval
java NotifyProcess
XFLOW-XML. Examples
1. SimpleWorkflow
The listing below is the XFLOW-XML
representation of the SimpleWorkflow model.
See the User Guide for more information about XFLOW-XML.
<xflow name="SimpleWorkflow">
<nodes>
<node id="StartNode" type="Start"/>
<node id="P1" type="Process"/>
<node id="P2" type="Process"/>
<node id="P3" type="Process"/>
<node id="P4" type="Process"/>
<node id="P5" type="Process"/>
<node id="EndNode" type="End"/>
</nodes>
<transitions>
<transition from="StartNode" to="P1"/>
<transition from="P1" to="P2"/>
<transition from="P2" to="P3">
<rule>[intValue < 10]</rule>
</transition>
<transition from="P2" to="P4">
<rule>[intValue >= 10]</rule>
</transition>
<transition from="P3" to="P5"/>
<transition from="P4" to="P5"/>
<transition from="P5" to="EndNode"/>
</transitions>
</xflow>
[back to start]
2. Counter Example XFLOW-XML Workflow Models.
<xflow name="CounterWorkflow">
<nodes>
<node id="StartNode" type="Start"/>
<node id="P1" type="Process"/>
<node id="P2"
type="Process"
/>
<node id="AndNode1" type="And"/>
<node id="C1"
type="Container"
containee="C1SubWorkflow"
/>
<node id="C2"
type="Container"
containee="C2SubWorkflow"
/>
<node id="EndNode" type="End"/>
</nodes>
<transitions>
<transition from="StartNode" to="P1"/>
<transition from="StartNode" to="P2"/>
<transition from="P1" to="AndNode1"/>
<transition from="P2" to="AndNode1"/>
<transition from="AndNode1" to="C1"/>
<transition from="C1" to="EndNode"/>
<transition from="P2" to="C2"/>
</transitions>
</xflow>
<xflow name="C1SubWorkflow">
<nodes>
<node id="StartNode" type="Start"/>
<node id="P1" type="Process"/>
<node id="P2" type="Process"/>
<node id="EndNode" type="End"/>
</nodes>
<transitions>
<transition from="StartNode" to="P1"/>
<transition from="P1" to="P2"/>
<transition from="P2" to="EndNode"/>
</transitions>
</xflow>
<xflow name="C2SubWorkflow">
<nodes>
<node id="StartNode" type="Start"/>
<node id="P3" type="Process"/>
<node id="EndNode" type="End"/>
</nodes>
<transitions>
<transition from="StartNode" to="P3"/>
<transition from="P3" to="EndNode"/>
</transitions>
</xflow>
[back to example]
3. Voting example XFLOW-XML model.
<xflow
name="Voting">
<nodes>
<node id="StartNode" type="Start"/>
<node id="Heidi" type="Process"/>
<node id="David" type="Process"/>
<node id="Wendy" type="Process"/>
<node id="Richard" type="Process"/>
<node id="AndNode" type="And"/>
<node id="Results" type="Process"/>
<node id="EndNode" type="End"/>
</nodes>
<transitions>
<transition from="StartNode" to="Heidi"/>
<transition from="StartNode" to="David"/>
<transition from="StartNode" to="Wendy"/>
<transition from="StartNode" to="Richard"/>
<transition from="Heidi" to="AndNode"/>
<transition from="David" to="AndNode"/>
<transition from="Wendy" to="AndNode"/>
<transition from="Richard" to="AndNode"/>
<transition from="AndNode" to="Results"/>
<transition from="Results" to="EndNode"/>
</transitions>
</xflow>
[back to example]
4.
Example XFLOW-XML model with XPATH rules
<xflow name="XMLExample">
<nodes>
<node id="StartNode" type="Start"/>
<node id="P1" type="Process"/>
<node id="P2" type="Process"/>
<node id="P3" type="Process"/>
<node id="P4" type="Process"/>
<node id="P5" type="Process"/>
<node id="EndNode" type="End"/>
</nodes>
<transitions>
<transition from="StartNode" to="P1"/>
<transition from="P1" to="P2"/>
<transition from="P2" to="P3">
<rule>//book/detail/inventory[@copies > 50]</rule>
</transition>
<transition from="P2" to="P4">
<rule>//book/detail/inventory[@copies <= 50]</rule>
</transition>
<transition from="P3" to="P5">
<rule>//book[title = 'XFlow User Guide' && detail/price = 10.00]</rule>
</transition>
<transition from="P4" to="P5"/>
<transition from="P5" to="EndNode"/>
</transitions>
</xflow>
[back to example]
6.
Example XFLOW-XML model for Approval workflow
<xflow
name="Approval">
<nodes>
<node id="StartNode"
type="Start"/>
<node id="Manager1"
type="Process"/>
<node id="Manager2"
type="Process"/>
<node id="VP1"
type="Process"/>
<node id="VP2"
type="Process"/>
<node id="AndNode"
type="And"/>
<node id="OrNode"
type="Or"/>
<node id="Notify"
type="Process"/>
<node id="EndNode"
type="End"/>
</nodes>
<transitions>
<transition
from="StartNode" to="Manager1"/>
<transition
from="StartNode" to="Manager2"/>
<transition
from="Manager1" to="AndNode">
<rule>[property.decision ==
Approve]</rule>
</transition>
<transition
from="Manager1" to="Notify">
<rule>[property.decision !=
Approve]</rule>
</transition>
<transition
from="Manager2" to="AndNode">
<rule>[property.decision == Approve]</rule>
</transition>
<transition
from="Manager2" to="Notify">
<rule>[property.decision !=
Approve]</rule>
</transition>
<transition from="AndNode"
to="VP1"/>
<transition from="AndNode"
to="VP2"/>
<transition from="VP1"
to="OrNode">
<rule>[property.decision ==
Approve]</rule>
</transition>
<transition from="VP1"
to="Notify">
<rule>[property.decision !=
Approve]</rule>
</transition>
<transition from="VP2"
to="OrNode">
<rule>[property.decision ==
Approve]</rule>
</transition>
<transition from="VP2"
to="Notify">
<rule>[property.decision !=
Approve]</rule>
</transition>
<transition from="OrNode"
to="Notify"/>
<transition from="Notify"
to="EndNode"/>
</transitions>
</xflow>
For more information
on XFlow go to: http://xflow.sourceforge.net